Categories
IT and Tech

Linux From Scratch

I actually attempted to build my own Linux distro from scratch waaaaaaaaay back in the early 2000’s when I got out of college and started working for IBM. I just couldn’t get it to work. Maybe it was because I was younger and impatient or maybe I just didn’t know as much as I thought I did, but either way, I never finished it and has been one of those elusive things that I wished I did much like getting my CISSP.

Now that I have my CISSP cert, I figured I’d give this another go and see if I can finally conquer the challenge I set for myself almost 20 years ago.

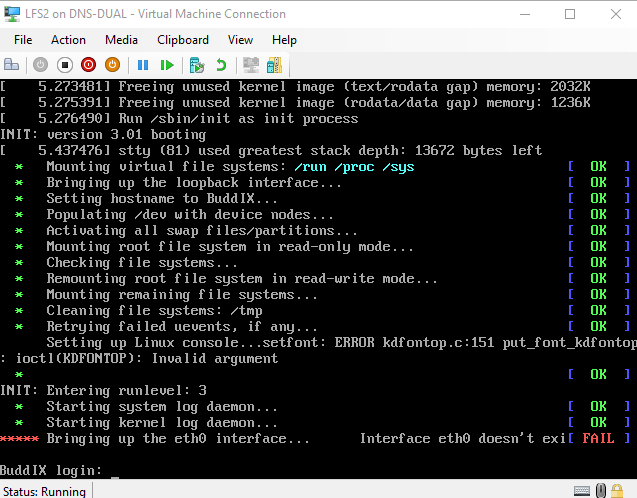
(Yes I know eth0 doesn’t exist. I need to figure out the right drivers for this Virtual Machine)

The Host

To build LFS I’ll need a host OS to build all the toolchain and initial environment. The entire process is very much like cross-compiling software for a different architecture except not.

LFS doesn’t list any recommended distros and while I’m partial to Debian as I’ve been running my servers with it for quite literally decades now, I decided to give a different more modern distro a go simply because I wanted to make sure that all the libraries were new enough to meet or exceed the LFS requirements. After looking around for a bit, I found a great guide from Kernotex on youtube who was running EndeavourOS so I figured I’d give it a go.

The idea was to use a EndeavourOS’s pre-installation live environment as my temporary host on a Hyper-V VM. Normally I use Virtual Box but I figured I might as well give Hyper-V a go.

I ran into some minor hiccups but eventually got it to work. The fixes are outlined in my post here: https://www.buddroyce.com/?p=687

Hyper-V VM Settings were:

  • Generation 2 VM (I totally should have used Generation 1, will cover why later in this post)
  • 6 Cores assigned (I originally had 24 cores assigned but it didn’t work that well. Will cover it later in this post)
  • 8gb-16gb of RAM
  • 50gb of HDD space
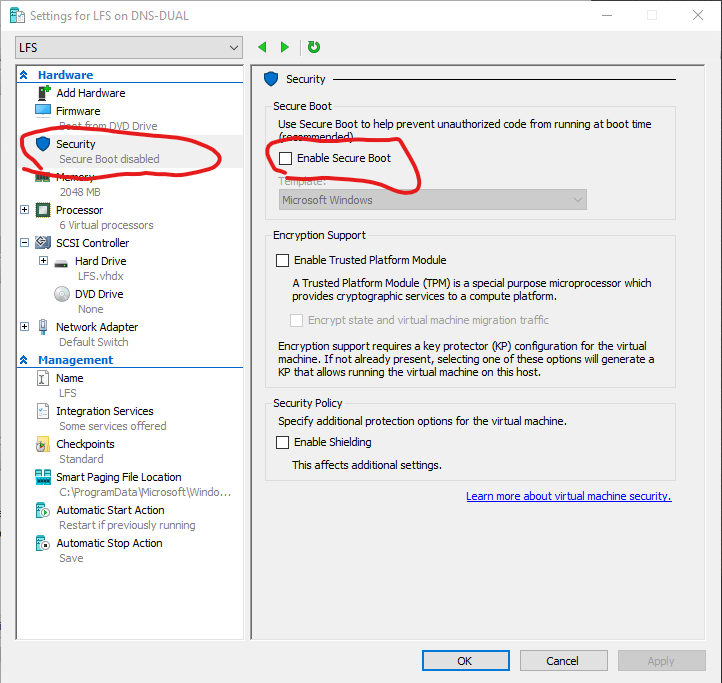
  • TURN SECURE BOOT OFF!! (otherwise EndeavourOS wouldn’t boot)

Why did I use EndeavourOS? Not going to lie, I was just following the Kernotex video on youtube but even though he was building LFS 10.1 and I was building 11.1, EndeavourOS had all the up to date binaries needed with next to no additional software required, which is awesome.

Unlike my attempt at trying to build Unikernels with Unikraft, getting things up and running for my LFS build was waaay smoother.

The Build

I know for years whenever I looked at doing a LFS build, I always ran into problems. Usually versioning and dependency problems that I just didn’t want to sort out or just difference between what was in the LFS book and what I was actually getting.

Thankfully LFS 11.1 came out pretty recently so a lot of the software versions from the book were still valid and most problems were addressed in the book. Between the book and Kernotex’s video, I didn’t find this build all that daunting.

Overall the whole process could have been done over a weekend but I made some screw ups that caused me to back track a little which I’ll cover.

Issues

Initially I ran into problems booting into a Linux host OS. EndeavourOS didn’t want to work and the Ubuntu pre-installation environment didn’t want to work either but those aren’t build specific issues. My build specific issues were

  • Errors Compiling & Testing
  • Cleaning too many things up
  • Not enough system ram
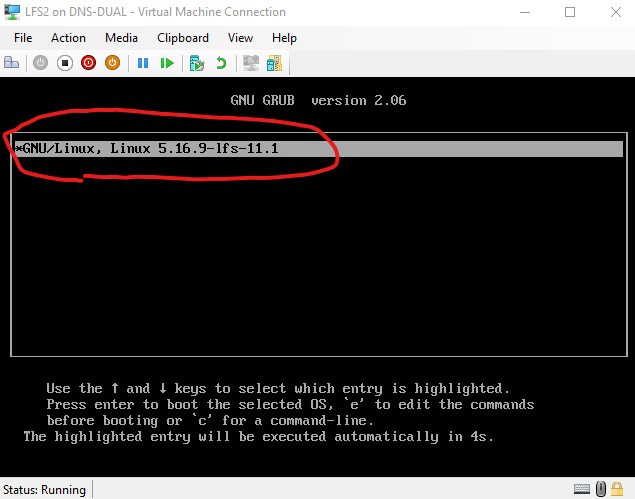
  • Unable to get LFS to boot at all

Issue 1: Errors Compiling

Originally I had the VM using the Hyper-V quick create which automatically defaulted to using 24cores and whatever ram I had.

I set the MAKEFLAG=”-j24″ as an environment variable to make full use of the 24cores but for some strange reason some of my code compiles started spitting out errors.

Reducing it down to 20 cores seem to help but I had to bring it down to 4-6 cores for code to finally compile without any errors.

I don’t know what the cause was but it’s likely to do with the code not being very parallel compile friendly. Concurrency is always an issue and it’s likely that with 24 cores, some code was done compiling but errored out when other bits of code that normally gets done in a 1-4 core system doesn’t exist.

If you run into similar problems. Try reducing the number of assigned cores.

make -j4 will assign 4 cores while make -j1 will assign just a single core to a compile job and there were definitely instances where I had to drop down to a single core to compile and test properly.

Issue 2: Cleaning up too many things

I seriously blame myself for being impatient and just copying and pasting stuff here.

During my first run through on my 3rd day of building LFS. I finished installing all the binaries and reached chapter 8.77 (Stripping). For some stupid reason I decided that it was a good idea to do the optional stripping of debugging symbols from binaries and libraries to save space. Little did I know that that would screw things up for me two chapters later when I tried to build the Linux Kernel.

Ended up redoing the whole thing again and learning from my mistakes. If it’s optional, it’s probably best not to do it until AFTER I get a couple of successful builds in.

Issue 3: Not enough system RAM

I should clarify that the VM has more than enough ram. My system has 64gb of ram but 32gb of it is allocated as a ram cache for my 3 drives. That meant that I had 32gb of ram left which was more than enough… until I try to do something else while code is compiling.

I found that while I could watch youtube videos while I had the VM running, I couldn’t do much else. Firing up any other video games on the host windows machine would cause things to really lag.

It turned out that the VM and my ram caching solution were conflicting a bit. Reducing my ram cache down from 32gb to 16gb solved the issue.

I have an additional 64gb of ram on order to bring my machine to 128gb of ram to fully avoid this even with several VMs running in the background.

Issue 4: Unable to get LFS to boot at all

This literally took me a day or two to figure out. After getting everything all reinstalled and building out my kernel, I was ready to reboot the system and all I got was… nothing.

It turns out that the base LFS build was meant for legacy systems and not systems running UEFI.

The Hyper-V VM I was using defaulted to generation 2 which meant it supports UEFI and not a legacy bios. The thing is.. once you create a VM and set it’s generation type, you can’t change it again, so I thought I was shit outta luck… until…. I decided to create a new VM using a generation 1 setting and using the existing vhdx hard drive file.

Since the .vhdx file is literally just a disk image, I figured I could use that the same way I could a real hard drive. If everything was physical, I would have just taken the hard drive with LFS on it and shoved it into a system with a legacy bios.

To my surprise, it actually booted.

Categories
IT and Tech

Hyper-V and Linux

After I completed my CISSP certification I wanted a break from all the studying and do something nerdy that I’ve been meaning to do but never got around to it. For me, this was doing a full Linux From Scratch build.

Back in the day I would just load up Linux on another machine to use as a host but since I now have my studio workstation at home with more cores than I know what to do with, I decided it might be a good idea to put it to work running some VMs.

Most of the VM’s I’ve worked with have predominantly been Type II hypervisors (meaning they run off a host OS) and every once in a while I’ll get to build a virtualization server using a Type I hypervisor. For some strange reason I completely forgot that Microsoft’s Windows Server Hyper-V is actually available on Windows 10 and 11 Pro.

With it being a Type I hypervisor, it meant that my VM’s don’t have the operating system overhead like a Type II normally would (read more performance), but more importantly, it also meant that if I wanted to run VMs in the background as a service, I totally could while I still use my workstation. Yeah, it’s probably not the best idea in a production environment but this is my house/home lab.

I’ll cover my LFS build in another post as I’d rather cover some issues I found while using a Linux guest OS under Windows Hyper-V.

Yes I know I could have just used WSL2 but I really didn’t want to mess with my main system all that much, especially since I’d likely be building and destroying many installs as I’d be testing a bunch of distros I’d like to use as the host. Technically speaking I could have just used ANY distro and then update the packages accordingly but I’d rather not muck around with that just to get my LFS build started.

For the most part, I ran into two common issues.

  1. Some distros just won’t boot or just get stuck in a black screen forever.
  2. When they did work, I couldn’t copy and paste from my host (My Windows box) into my guest (my virtualized Linux box).

Issue 1: Getting Linux distros to work properly

After looking at a few distros, I settled on the EndeavourOS pre-installation live environment as my host for my LFS build. However, for some strange reason I couldn’t get it to boot properly.

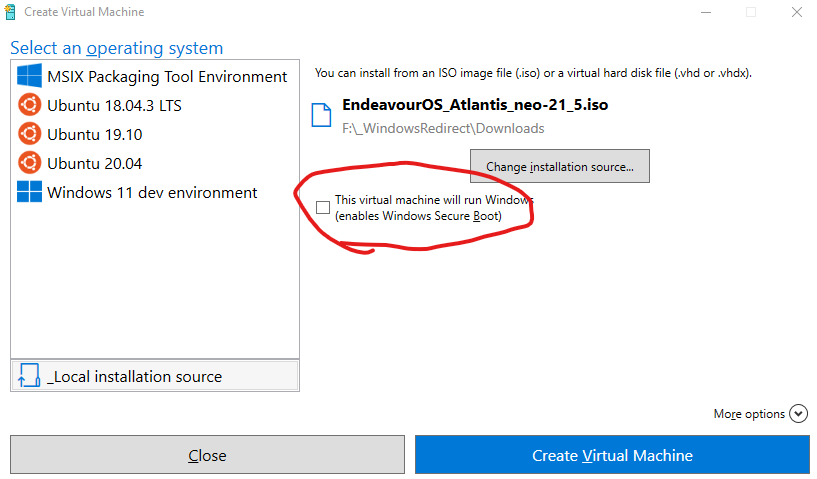
Found out after a bit of searching that this problem can be worked around by using the Quick Create feature under Hyper-V and unchecking “This virtual machine will run Windows”

After doing that, EndeavourOS booted fine!

Now it’s great that I got it to work but the problem is my main SSD where Hyper-V likes to defaults to doesn’t have that much space and I’d like to have my VMs sitting on a larger secondary SSD I have sitting around and set other options that the quick create menu doesn’t give me (like limiting the size of my virtual hard disk).

So now that I know Hyper-V will work, I just gotta figure out how to configure it manually so I don’t have to use the Quick Create and it turns out all I needed to do was disable secure boot under the host settings

This issue also replicates itself while I was trying to install some other distros, so if you run into the same problem. See if Secure Boot is enabled.

Issue 2: Getting Copy/Paste to work

Yes I know I really should manually type everything but sometimes, I just want to copy and paste text/urls/commands from my browser in my host machine into my VM. When I was running Virtual Box, I was fully able to copy/paste between host and guest no problem after I install the guest tools, but I couldn’t find any that I could use under Hyper-V and EndeavourOS.

Online searches didn’t bring up much other than making sure I have enhanced sessions turned on for both the Hyper-V server and the guest, which I already did but it just didn’t work for the life of me. Sure I could just use a browser from within the VM but I really didn’t feel like doing that.

Apparently the Ubuntu distros from the Hyper-V Quick Create menus have guest tools built into the distro but I couldn’t get it to work either.

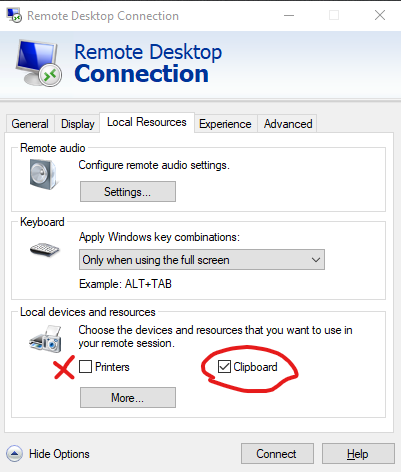
The only solution that worked was using xrdp and instead of connecting through the Hyper-V manager (effectively running VMConnect), I’d have to run RDP and remote in.

Thankfully I found a script that sorts all that out for me. I couldn’t get it to work under EndeavourOS but it did work fine under Ubuntu (and it supposedly supports Debian as well).

xRDP – Easy install xRDP on Ubuntu 18.04,20.04,21.04,21.10 (Script Version 1.3) – Griffon’s IT Library (c-nergy.be)

Following the instructions, the installation was pretty painless.

  • Run wget https://www.c-nergy.be/downloads/xRDP/xrdp-installer-1.3.zip
  • Unzip the file
  • Set the script to executable (chmod +x)
  • run the script
  • LOG OUT OF THE SYSTEM (very important)
  • Run remote desktop connection

What works is the ability to copy and paste between host and guest OS’s. I initially ran into a problem where I’d RDP into the VM but would run into a black screen. Turned out it’s a known issue as the user that’s trying to remote in can’t be currently logged in. Logging out of any sessions solves that.

I disable printer sharing because printers always seem to cause problems and I don’t think I’ll need to print anything from my VM.

The sound redirection doesn’t seem to work even when I run the script with the sound redirection flag or run pulseaudio -k but I really don’t care about sound on the VM. Being able to copy and paste between host and client was the real win for me here.

Categories
IT and Tech

Recovering from a MySQL InnoDB crash

On Feb 9th 2019, the datacenter where the Virtual Private Server that I use for this site(and many others) experienced a bit of a hardware failure which required some emergency maintenance.

This happened overnight and when I woke up, I found my inbox with 100+ emails alerts from the various sites that I manage indicating an error with connecting to the database.

Normally this isn’t a huge issue but this time things were different. The MySQL server not only wouldn’t start, it also didn’t provide any logs in either the MySQL error log or the system error log. I didn’t have any recent backups and neither did the datacenter, so this meant that had to do some serious guess work.

If that sounds similar to what you have to deal with, don’t worry. It’s fixable.

The Fix

Before you start screwing around with a live production database, unless you have daily or weekly backups that you would be ok with, the first thing you’re going to want to do is extract whatever data you can.

To do that, we’re going to boot the MySQL in forced recovery mode. There’s a line in your mysql my.cnf that says “innodb_forced_recovery = 0”

Change that 0 value to 1 or just add that line if you don’t have it.

This may or may not work depending on the issue. If it doesn’t work, try a value of 2 or 3. If recovery levels 1-3 won’t work for you, there’s still hope as there’s also levels 4-6, however, do understand that recovery levels 4-6 may cause data loss with level 6 resulting in guaranteed data loss. So work your way up from level 1 and pray to god that your database boots up in the earlier levels.

In my case, I had to use recovery level 4 which puts me in a risky position but at least it booted.

Once you find a level that boots, it’s time to backup and restore your databases/tables

Backup and restore MySQL

For this you have two options. Either export the databases using phpmyadmin or use mysqldump.

Both tools will fail once it reaches a table that’s corrupted so your mileage may vary.

To dump ALL databases run

mysqldump –all-databases –single-transaction –quick –lock-tables=false > someName-full-backup-$(date +%F).sql -u root -p

To dump one specific database run

mysqldump -u username -p databaseName –single-transaction –quick –lock-tables=false > databaseName-backup-$(date +%F).sql

To dump one specific table run

mysqldump -u username -p –single-transaction –quick –lock-tables=false databaseName tableName > databaseName-tableName-$(date +%F).sql

Once you have everything backed up, this is where it may be easy or not as it depends on what the issue is and what innodb recovery level you had to use.

Finding the faulty table

Finding the faulty table

Completely remove MySQL server and do a fresh re-install

This step

Remove MySQL completely (instructions for a Debian based system)

sudo apt-get remove –purge mysql\*
sudo apt-get clean
sudo updatedb

Reinstall MySQL (in my case it was 5.6 or 5.7)

Download the mysql repository configuration tool

wget https://dev.mysql.com/get/mysql-apt-config_0.8.12-1_all.deb

(you can get whatever the latest version is at
http://dev.mysql.com/downloads/repo/apt/ )

Install the tool using

dpkg -i mysql-apt-config_0.8.9-1_all.deb

You get the option of selecting versions 5.6 or 5.7. I went with 5.6 because that’s what was running before.

Update the apt repo list and install the damn server

apt-get update
apt-get install mysql-community-server

Re-install the mysqli connector (in my case I needed it for php5.6 and php7)

apt-get install php5-mysqlnd
apt-get install php-mysql

Note: you can get away with php5-mysql but for MySQL 5.6 or higher you’re going to want mysqlnd. (the ND stand for Native Driver).

While it php5-mysql and MySQL 5.6+ will most likely work, depending on the level of error reporting, you may get a LOT of notices about incorrect minor versions. It’s a problem I ran into before and it’s more annoying than anything.

To restore a backup:

For full backups

mysql -u root -p < full-backup.sql

For a specific database

mysql -u [username] -p databaseName < databaseName-backup.sql

For a specific table

mysql -u [username] -p databaseName < databaseName-tableName.sql

Understanding the InnoDB recovery levels

Categories
GameDev

So you wanna get in the games biz?

(Originally written and unpublished on March 24, 2016, updated, revised and finally published in 2018!)

Getting hired in the gaming industry OR Tips and Tricks for the job hunting Indie Game Designer/Developer.

Being the head honcho at a small game studio means I’m occasionally bombarded with e-mails from people looking for a job or an internship at my company. I’ve seen some good and a lot of bad so I figured I might as well share with you folks what goes through my head when I get resumes and applications to help you improve your odds at landing a job in the biz.

Whether you’re a student trying to land an internship or a seasoned vet jumping ship, these are things to keep in mind.

Have an online presence

Whether it’s LinkedIn, Twitter, DeviantArt or your own web site, have some sort of online presence that the folks looking at you can refer to. However, do keep in mind that the material on the web can help you and hinder you at the same time. So if you’ve posted something on Facebook that may make you look like a douche for some reason or other, make sure it’s private.

Most studios like mine don’t have dedicated HR people. Guys like me don’t use whatever fancy black magic tools HR people use. If you’re applying for a position I’m going to Google you. My usual search term I Google up is “<Your full name>+<Artist/Programmer> or <your school/company you work for>. Try Googling yourself, find anything? If you can find something, great, if you find nothing it’s not that bad.

Have a curated portfolio

This is really important for artists and by curated portfolio I don’t mean your DeviantArt page. Yes I did say have one in my previous section, that’s the fallback if I can’t find your portfolio (which should be part of your website. You do have one right?). What do I mean by curated portfolio? It means a showcase of only your *best work*.

This makes sense for artists in all capacities as well as for those looking for a in a non-art position. Showcase some of the best work you’ve done and make sure it’s polished.

Have a demo reel

This seems pretty foreign to those who are not artists. But a demo reel is a great way for potential employers to get a quick 30-60 second preview of some of your best work. The demo reel could be just a slideshow of stills you’ve use or video footage of a game you’ve worked on but the important thing to keep in mind is that these are the things that highlight your skills.

Know what you want to do / Know your specializations

This is more applicable to the students trying to get into the biz. A lot of video game schools cater to the underachieving gamers out there which means most of the time, the skillsets taught are going to be rather wide with little to no specializations. That’s not a bad thing since it usually means students would come out fairly well rounded(if they actually put the effort into it). The downside is that that lack of specialization means that most graduates have no idea what they want to do or focus on other than “just make games”.

“Just because you didn’t specialize in something, doesn’t mean you’re a generalist”

It’s best to have an idea of what you’re interested. The most common ones would be game play programming, engine programming, graphics programming, network programming, tools programming, level design, lighting, character design or character modelling, environment design, audio/sound programming, etc..

Game jams are ok, releasing something is better

Back in 2012 or 2013, I would have told any student trying to get into the video games industry to do as many game jams as they can get. That was then, now that we’re approaching the end of 2018, I would still suggest doing Game Jams but it would be better to focus on getting a small game released somewhere or at least get a couple of publishable prototypes done.

What’s changed you ask? Well for starters, unlike 2012, the market is hugely saturated with people wanting jobs in the field of game development and for the most part, their portfolios tend to be mostly filled with unpolished prototypes. You want to set yourself apart from that.

If you can’t actually release a game, put together a publishable prototype. This was a term I stole from Mark Czerny, the architect behind the PlayStation 4. This is basically a super polished prototype made to showcase what the final game *might* look like and to test out the mechanics. Think of it as an E3 demo for a game you’re working on.

Look into the details of your contract

This is something I warn a lot of students who want to get into the biz. Many companies (large and small) will have IP clauses in them stating that during the entire time of employment with the company, anything and everything you make or come up with is property of the company. That means that as long as you work for that company, any cool games you might have as side projects or even story ideas are property of the company. It’s pretty shitty and you can try to talk them out of it but for the most part, unless you’re super awesome at what you do and they really, really, really, really want you, odds are you’re going to be given a take it or leave it situation.

Maybe one day game companies will learn from the engineering firms and add the following line to their contracts

“for the purposes of <whatever section in reference> and hereof, the terms Conceptions, Inventions and Copyrights shall mean only those Conceptions, Inventions and Copyrights that the employee may make alone or in conjunction with others during the period and arising out of his/her engagement with the company.”

Understand NDA’s

If you’re going to work in the video game field, you really need to know what NDA’s are and what they mean. Unless it’s written in the contract that you can mention something about the project after a set period of time (usually when the game is released), that usually means YOU CANNOT TALK ABOUT THE PROJECT EVEN AFTER IT’S RELEASED.

Artists and Art Style

Quite often I get portfolios from artists who create superb work but they seem to be stuck in one particular art style. While there’s nothing wrong with developing a particular art style, unless you plan on getting a character design job, there’s a high chance you’ll be asked to follow a particular art style prescribed by your art director.

My suggestion is to not only showcase things in your portfolio of your own art style but also in other art styles as well. This is a typically a large reason why I turn down many fantastic artists because the prescribed art style for our projects are typically very anime inspired, largely because we usually get actual artists from the anime biz in Japan to do the designs, and for the most part, a lot of folks here can’t quite hit it.

For those stubborn die-hard folks out there that are adamant about sticking to their art style and looking into the character design job. The reality is that the character design jobs are few and far between, as someone trying to get into the industry, your better off being able to do more than just character design.

Render things in engine

If you’re a 3D artist planning on getting a job in the video game industry, showcase renderings of your work running in engine. It doesn’t matter if it’s Unity, Unreal Engine, CryEngine/Lumberyard or some other 3D game engine. From my own experience and friends of mine from the industry who have to review 3D artist work, seeing a nicely rendered model in a demo reel captured as in-engine footage lands you much bigger points than just putting together a nice sculpt in ZBrush or something.

The reason behind this is that there are several steps required to get a really nice looking sculpt from Zbrush into a game engine without boggling it down. This is primarily because models straight out of Zbrush or similar sculpting tool are completely unusable in engine as the poly count is usually waaaaay too high. If you can demonstrate that you can not only make nice 3D models but also reduce the poly count while keeping it looking good, you’re in a much better situation to be hired.

There is no such thing as the “ideas guy”

Ok maybe there is, but it’s usually tied to another position. The closest would be a pure game designer role but to be honest, unless you can bring lots of $$$$ to the table, no one is going to hire you purely as an ideas guy. Understand that.

Can’t program and can’t do art? Don’t worry

While for the most part, gaming jobs focus on programming or some sort of artistic work, there are also jobs outside of those roles. Some of these roles include, producer, scenario writer, motion capture actor/director/technician, QA Tester(Game Tester) and a whole slew of roles in marketing and PR like community manager or social media manager.

These roles however are harder to find in smaller studios because realistically, those roles tend to be handled by everyone there because there’s no budget for those roles specifically.

Avoid Programmer Art whenever possible

Programmers, the fugly programmer art is *only good* for internal prototypes. If you’re a student in a game development program and your primary goal is to handle the programming in games, work with an artist to get you some polished artwork, buy some or just “borrow” some if you have to. Even though your work is primarily on the programming side, the people who will be looking at your portfolio will most likely be very visual people.

If you can’t get artwork that looks good at least make it less distracting. Stick with blocks or stock assets that come with the engine. Most of the “free” assets in marketplaces tend not to look that good or look out of place in a sparsely put together environment.

You’ll need more than Passion & Talent

Passion and Talent can only get you so far, you need a solid work ethic and a willingness to get the job done even if it’s doing something you don’t like.

In fact, sometimes we hire people who aren’t quite as passionate or talented simply because we know they’re willing to get the job done even though it’s not what they want to do. Nothing is worse than hiring someone who thinks they’re a rock star and half asses stuff because it’s not “their way” or because “their idea” got rejected.

Your ideas and opinions are great but sometimes the project is locked in place. You’re probably going to have to revise and update the same bits of code and artwork over and over and over until you have nightmares, so do yourself a favour and drop the ego at the door.

Making games is rewarding when it’s done but for the majority of the process, it might suck and suck hard because making video games is NOT EASY.

Don’t give up!

This is a big one. The one big reality check most students have when they graduate out of gaming school is that it’s not exactly easy to get a job making games. You could be the best in your class or the best in your school but it doesn’t necessarily mean you’re going to be the top 5% of the industry. In addition to all the other graduates that flood the market every year, many also forget that they’re competing for positions with industry vets that just lost their jobs.

At the time of writing both Capcom and Bandai Namco out in Vancouver shut down their studio (among others). All the people that lost their jobs there are probably looking at the same gameplay programmer or character modelling job you’re looking at.

It’s super discouraging to graduate at the top of your class only to find yourself struggling to find a job, but don’t give up, try another company. Larger companies such as EA, Ubisoft and Square Enix are going to have the toughest competition because everyone wants to work on the next Battlefield, Assassins Creed or Final Fantasy game. If you can’t cut it there (and don’t worry, many won’t), take a look at smaller indie companies or go do some game jams and see if you can start a project with someone there.

Keep developing your skills

Do yourself a favor and keep your skills up to date. Just because they didn’t teach you something in school doesn’t mean you can’t learn it on your own.

If there’s any upcoming technology that might be hot, get on it.

VR, Unity, Unreal, mobile, whatever.

Every once in a while there’s a rush in the industry to hire people who have experience in some new hot tech. It used to be mobile development for iOS and Android, then it was Virtual Reality and Unity. Keeping your skills up to date is especially important if you’re looking for a job. I pretty much got contacted by one or two people each and every week for a few months because everyone was looking to get into VR development and I happened to have some experience screwing around with the original Oculus Rift DK1 back in the day.

 

Categories
IT and Tech

How to reset Nintendo 3DS Parental Lock

Growing up almost everything I got was 2nd hand and as a grown ass adult, I still rarely if ever get anything “brand new” things these days.

That said Christmas is coming soon and with Pokemon Sun and Moon being released on tomorrow on November 18th, I know there are going to be a few people who may end getting themselves a 3DS or asking for one in the near future.

For those who are in a similar boat as I was and still am and pretty much perpetually stuck buying second hand gear, if you end up getting a 3DS with a parental lock and don’t have access to e-mail address that’s associated with the parental lock, you can still reset it.

This works for the 3DS, 3DS XL, 2DS, New 3DS, New 3DS XL and I’m pretty sure it works for the Japanese LL versions(which are the same as the XL versions but for the Japanese Domestic Market or JDM).

Technically speaking, this is really only for folks living in the US but will work outside as well. Since I’m in Canada, I’m technically supposed to call Nintendo of Canada but I got this to work as well.

If you’re looking for a Master Code generator, you’re wasting your time here. Unless you have an older 3DS that hasn’t been updated in a loooooong time, the Master Code generators you find on the net for the most part don’t work anymore since an update Nintendo put out over a year ago. This is the proper method Nintendo wants you to use. It’ll cost you a whopping $0.50 USD.

<To do the reset go here>

You’ll need the units serial number (located on the back), the Inquiry number (more on this after) and an e-mail address for Nintendo’s automated system to e-mail you the master code.

To get the inquiry number goto SYSTEM->PARENTAL CONTROLS->FORGOT PIN->I FORGOT->When prompted to send an e-mail, hit CANCEL. You will see a screen with your Inquiry number. (it should be 8-10 digits long).

As mentioned earlier, this online automated system only works for those in the US. If you’re elsewhere they want you to call your countries distributor or something, but thankfully, you can still lie and say you’re in the US. For tax verification they’ll ask what state. I just use NY and found a random zip code on Google.

They’ll need some sort of credit card to prove you’re an adult and charge the card $0.50USD. I’m not too sure if VISA debit also works but I don’t see why not.

Once you get all that info entered, you’re pretty much done.

The Master Key is only valid for a couple of days and should be 5 digits. The 3DS does not “call home” for any activation and doesn’t have to be online at all. If you enter the Master Key and it says something about it being invalid, the most common error I found is the date being wrong. if that’s the case, you can change it in your system settings.

I hope that helps some folks who ended up getting a second hand 3DS and wanted to get rid of the parental lock.

Cheers,

Budd

Categories
IT and Tech

An upgrade on a downgrade

A little over a month ago when the Abyssian Knights Kickstarter was in full swing, I sold my Intel Skylake based CPU/Mobo/Ram to a friend of mine to fund some of the marketing.

Ended up resurrecting my old Core2Quad system. Even overclocked, it still felt a bit sluggish so I decided to see to see if I could get any el-cheapo chips off ebay for my ghetto socket 775 system. Then I found some people selling some old socket 771 Xeon X5460’s that have been modified to fit in the socket 775 mobo.

That was a month ago. The chip finally came in today. I think I spent like $30-$40 for it. I figured, if it works, great, if not it wasn’t a huge loss. Dropping in the chip, I was expecting some serious issues but it ran without any problems except for the system telling me “BIOS update recommended. To unleash this CPU’s full power, please perform BIOS update procedure” or something like that. I already had the latest BIOS for my board (from way back in 2010), but I figured what the hell, I’ll give it a shot.

BIOS updated. Same thing, then I read something about some BIOS microcode that had to be edited to get it to work. Rather than spend the rest of my day trying to figure it out, I found a handy Chinese site that already had a version of my BIOS with the microcode edits. Did the update and BAMN. No more nagging screen. It didn’t seem to make the system any more stable but whatever.

In case anyone else is in the same position I’m in with an old ass socket 775 that’s looking to upgrade to a Xeon (cause you’re also too cheap to spend money on a real upgrade). Here’s the Chinese site with the socket 771 microcode injected BIOS updates.

http://genius239239.myweb.hinet.net/771/

Overall, everything feels a bit snappier. My Cinebench scores went up a decent amount (no where near my workstation at the studio). Ended up overclocking the thing from 3.16ghz to 3.475ghz. It’s running completely stable (so far).

Definitely worth the $40!

Categories
GameDev

Demystifying the tech behind Ninja Theory’s Senua

Ever since Ninja Theory showed off their Hellblade Live/Senua demo at GDC 2016 I’ve been thinking, how the f*ck can I pull that off? I mean sure I don’t have Epic Games, Cubic Motion or 3lateral as partners but it doesn’t mean I can’t recreate everything on a budget right? Ninja Theory’s Hellblade team is only 16 people, not 160 so it’s not like they have that many more people than I do, so there must be something they’re doing that I can leverage on.

For those of you who have absolutely no idea what I’m talking about, here’s the GDC presentation:


Doing digital real time cinematography has been something I’ve been wanting to do for a while and I’m glad to see that a small company like Ninja Theory managed to pull it all off. Although they didn’t do it alone, so let’s see what part’s of the equation did each company provide

Epic Games : Unreal Engine 4. The version Ninja Theory uses is the same as what you and I can get. So it’s not like the folks at Epic are doing anything special for them specifically.

3lateral : These guys specialize in creating characters and animations. Tameem Antoniades of Ninja Theory mentioned in that GDC video 3lateral having some really nice face scanning and face rigging solutions so it’s likely that’s the part they played in all this.

Cubic Motion : These were the guys Ninja Theory used for the facial solver.

Then there’s Ninja Theory themselves, who were the guys putting it all together.

The GDC video was kinda impressive but during Siggraph 2016, they decided to step things up and leverage Unreal Engine 4’s new sequencer and do some live 3D cinematography and now this is what I’ve been looking forward to. While the demo at GDC was really just them demo’ing the facial animation, the Siggraph demo is live 3D cinematography.

Here’s the video:

So now that question is… who else was involved? In addition to the previously listed partners, they’ve added a couple of other new partners here. Namely, House of Moves, Ikinema, Technoprops and Nvidia.

So let’s see what these companies do:

Nvidia : Yes they make hardware but they also do a lot of software as well through their Gameworks division. What they ended up doing here I’m not too sure. Although I wouldn’t be surprised if all they did was provide the new Pascal Titan X to run everything on. UE4 is really optimized for a single graphics card and to get the fidelity needed to do all this in real time without lag, they’d need a pretty beefy graphics card. As of right now, the biggest baddest GPU on the block at the time this happened would have been the Pascal based Titan X.

Technoprops : These guys do facial capture systems. It definitely looks like the Technoprops headset was being used in the siggraph video.

Ikinema : These guys offer a full body IK solver for more natural motion when applied to animation. It’s likely the Ikinema IK solver was just used to clean up the animations in real time as mocap usually does require some clean up work. Really brilliant use of this tech for that reason if that’s really what they used it for.

House of Moves : These guys are a mocap studio and were probably the ones that owned the mocap stage and setup the virtual camera systems. In the full hour long siggraph video, you’ll see that Tameem is operating a virtual camera with a House of Moves sticker on it.

That’s great but now I gotta figure out what all the hardware is.

We already know that the facial mocap headcam is was provided by Technoprops using the facial solver built by Cubic Motion. Looking at the mocap stage, the cameras don’t look like the Optitrack cameras and the Virtual Cameras don’t look like the Optitrack Insight. So I had to do some digging. After a couple of days of looking for an Optitrack Insight VCS alternative, I decided to look at the House of Moves website and BINGO! It looks like everything is made by Vicon instead of Optitrack, except there was no mention which VCS they were using. So I decided to dig even furth by going to the Vicon website and there it was, the Vicon Camera System.

There was no pricing available and for some strange reason I had never heard of them before. Looking at their resellers and offices, they have no presense in North America because that marketing is dominated by Optitrack.

So now that I have all the puzzle pieces together. How I can put together a cheaper alternative?

Unreal Engine 4 : I got the same build Ninja Theory gets and so can you. If anything they might get a nightly build with more features but by now with 4.13 just being released I’m pretty sure whatever Ninja theory had for the Siggraph demo, I have too.

Animation & Rigging : Yeah we don’t have super experienced animators and riggers, but I’m sure we can get at least half way close. The Abyssian Knights project is an animated project that we’re replicating 2D with, so we don’t need super realistica rigs. In fact we want it to look like it’s got hand drawn physics (read: improper broken artist driven physics to make things look cool).

Motion Capture : There’s no way I can afford a full mocap stage. Even at the cheapest it would still be $10k+ and take up space. We currently use Noitom’s Perception Neuron which doesn’t require a mocap stage and only costs us about 1/10th the price of the cheapest full stage mocap system.

Facial Mocap : This seemed to be a two part solution for Ninja Theory as they used the headcam from Technoprops and the solver from Cubic Motion. Pretty sure Technoprops and Cubic Motion are service companies and wouldn’t want to sell some indie like me their solution and while I probably could write my own ghetto facial solver using OpenCV, It would probably be easier to find someone who’s got a full solution. Enter Faceware! They offer an indie package of their facial mocap solution. It’s not exactly super cheap but still affordable by indies. The best part is they offer both a software and hardware solution. We were originally going to use Faceshift for the Abyssian Knights project and we had a license previously but I’d rather move onto a different solution as it’s not possible to renew the license.

There still is ONE part of the puzzle piece missing though. The virtual camera system? I mean I COULD get Optitracks Insight Mini but the controller alone isn’t enough. I’d still need to get Motive which is $999 and a 6DoF tracker of some sort or spend $2300 for the V120:Duo and a license of Motive Tracker. Thankfully the pluging to stream data to Unreal Engine 4 is free but it still requires Motive so there has to be a better solution. The hunt begins. If anyone has a good solution here, please let me know although I get this feeling I might have to build one of my own.

Update: Nov 17, 2016 – Still trying to sort out the Virtual Camera system. Going to attempt using the motion capture sensors I have and stream it into Unreal. Pretty sure I’ll have to rig the camera onto an actor but this might work!. Will post results when I get something working.

-Budd

Categories
IT and Tech

Adobe Premier Audio Sync Issues

Being my own video editor sucks. For some strange reason when I load up certain videos into premier just to do something like ad music to or edit/trim a section off some, a lot of the times, the audio goes out of sync somewhere halfway through the recording. The weird thing was that the video is fine outside of Adobe premier!!!.

I was putting together the Abyssian Knights Kickstarter Post-Mortem for backers today and the sync started off ok but was pretty bad 3/4 into the video, so I decided to find a solution.

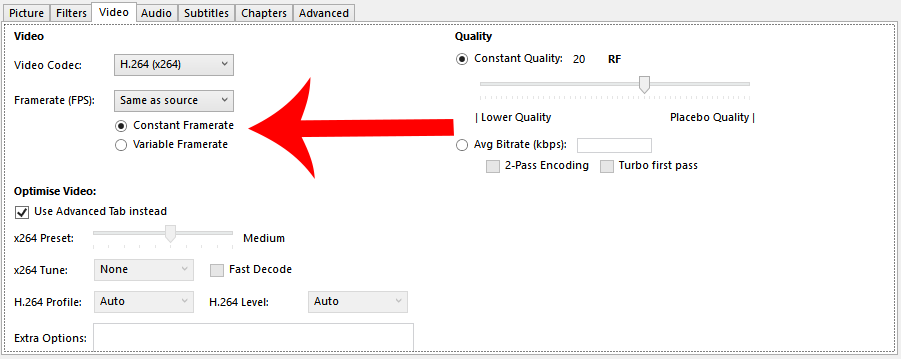
It turns out that my iPhone that I recorded everything with actually has variable frame rate recording. Even though I’m setting it to 1920×1080@30fps, the framerate isn’t locked at a solid 30fps. Thankfully Handbrake has an option to transcode videos to convert videos to either constant frame care or variable frame rate.

ConstantFrameRate

So I loaded up the video and started processing it. Fired up the video and the audio was properly sync only problem was.. the whole video was upside down!!! For some stupid reason Handbrake must not have understod Apple’s method to saw “this side up” so I had to dig up on the internet to find a way to rotate video.

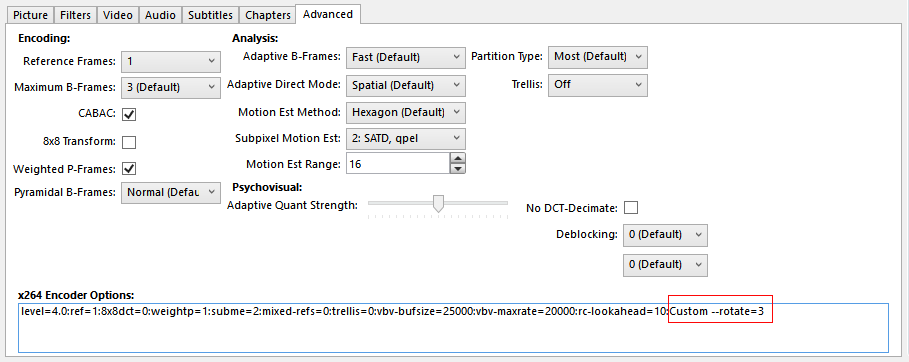
After a bit of searching, I found that Handbrake can rotate video’s via command line. Turns out the command line options can also be entered as part of the advanced options.

CustomRotate_Handbrake

The trick to fixing the upside down image as to use: Custom –rotate=3 (3 being 180% rotation).

Hope this helps anyone with a similar problem or at least I know it’ll help me when I make the same screw up again.


Cheers,


Budd

Categories
Business Kickstarter

Abyssian Knights – Why I segmented my market

I should have done up a post here for this a while ago since this is afterall my own Kickstarter project, but better late then never I guess!

CLICK HERE TO HELP MAKE ABYSSIAN KNIGHTS HAPPEN

As some of you may already know, I’ve been working on a 3D CG animated web series for a while. We’re finally at the point where I feel comfortable doing a Kickstarter. Irregardless of whether or not the campaign succeeds, I’ve collected a lot of data for the stuff I’ve done.

A lot of people believe that you need to maximize your Kickstarter campaign and get as much money as possible, but I don’t think of Kickstarter as a way to generate pre-sales like most people do. My goal is to raise awareness and get funded by folks who really believe in what I’m doing and not just sell them something.

Being someone who’s done a lot on the post-campaign side of Kickstarter projects and not just on the pre-campaign and campaign stages which are typically what a lot of people study, I wanted to screen out the mass market that’s really only interested in the final product and only focus on the early adopters who in my experience, while may not be the most profitable in terms of funding a Kickstarter, they are the most loyal and actually have the highest tolerance for risk which leads to less headaches in the post-campaign stage.

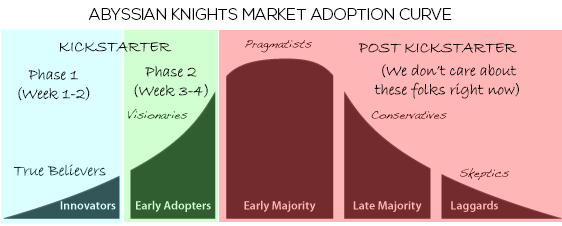
AK_MarketAdoptionCurve

This is my market segmentation curve. During the Kickstarter I’m only focusing on who I call the True Believers and the Visionaries. These are the folks who need the least amount of tangibility and to be totally honest, at this point in time I don’t want to give away too much in terms of story and plot line because it’s prone to change based on what I can get in terms of funding.

Unlike funding a film with live actors where I can just dress up someone as a new character, every additional character needs to be created so we have to work the script around what we have and not what we would like. That creates a bit of a rift between us and the early majority which is labeled as Pragmatists in the market segmentation. These are the folks that need to know the in absolute certainty fine details and have very little tolerance for risk and or change.

You don’t know how often I’ve had to deal with people during the post-campaign stage of projects who want their $10 back for a variety of silly reasons. From things like an update going out indicating that project story is going a slightly different direction or if the project is taking a bit of a delay because of production issues. Even if they only put in $10, a lot of them act entitled like they put in $1,000,000 and won’t tolerate anything other than exactly what they backed. These are the folks I’m trying to avoid at this early stage of the project, not because I think they’re wrong but mostly because the project isn’t ready for the mass market which is better catered to when we have all the episodes completed or have a whole season for them to watch to see if they like it enough to put in $10.

Either way, I’ll be posting my findings about the campaign once it’s done. I’m doing a lot of stuff that’s counter intuitive from what “experts” who have sorted out how to maximize funding for crowd funding projects, but everything done is intentional because this time I’m funding this project for my own project where I have to deal with the aftermath.

Cheers,

Budd


Categories
GameDev

UE4 Editor Graphic Settings

It definitely pays to look into things a bit. The crew at DNS and I have been crazy busy cranking things out for the Abyssian Knights Kickstarter. For the longest period of time, the level always looked weird on Tiff’s machine and by weird, I mean the characters looked super pixelated like there was no anti-aliasing at all and the backgrounds lacked any kind of shading making the white walled room look like one big white blur.

After Tiff decided to copy the project file on her home computer to work on some of the animations, I realized that the problem was isolated to her laptop since it looked fine on every other machine including my workstation, my laptop and even my ghetto old desktop at home which is almost 10 years old.

Given that her laptop had some weird issues before like screen tearing when playing back videos. I decided that it would be a good time to reset the settings and update everything. Her BIOS was a bit out of date but that didn’t really change anything. It wasn’t a gamma or color correction issue either so I was really stumped.

Since the same stock UE4 installationn with the default settings were used I thought it might have just been a bad graphics card issue. That’s when I decided to look into the whole Engine Scalability settings thing looking for something to tweak.

Checking my workstation, the quality setting was set to EPIC but for some strange reason my laptop was set on HIGH, even though I used the exact same installer, engine version and literally just copied over the project file(haven’t bothered setting everything up for Perforce just yet). That made me think that these values must be automatically set based on some sort of weird deterministic magic.

Looking at the same settings on Tiff’s machine I saw the problem!!

For some stupid reason, it was set to LOW! This was probably because her graphics settings were set to maximize performance over quality and the engine just set it that way for performance. Setting it on anything other than LOW fixed the problem. The weird thing was, when I clicked on the AUTO button, it set itself to MEDIUM by default (granted this was after I reset everything and put her system back to focus on quality over performance).

So where do you find this setting? Look at the top bar of your UE4 icons and look for Settings->Engine Scalability.

UE4_EngineScalability